
This post absolutely has nothing to do with school...but one of my BIG to-do's this summer has been to get our house semi- decorated. If you remember we moved in November. The middle of the school year {before the holidays!} is not the ideal time to move lol! So...I've had lists of things I want to get done/ organized / decorated for our house that I just didn't have time for during the year. My next goal is to tackle our master bedroom...we got a new duvet cover (it had been 6 years people!!) and it inspired me to really focus on our room. I saw this burlap bed skirt when I searched on Pinterest and became obsessed! So...I made this little tutorial for you guys if you're interested in making one for yourself! It's SO easy and NO sew!!


Do you know the burlap trick?! I snipped the burlap a teeny tiny bit where the fold was from being folded in half on the bolt.

Once you make that little snip, grab one of the threads that run down your burlap (where you will want the guide to be for a straight line.) Pull the thread until the burlap gathers.
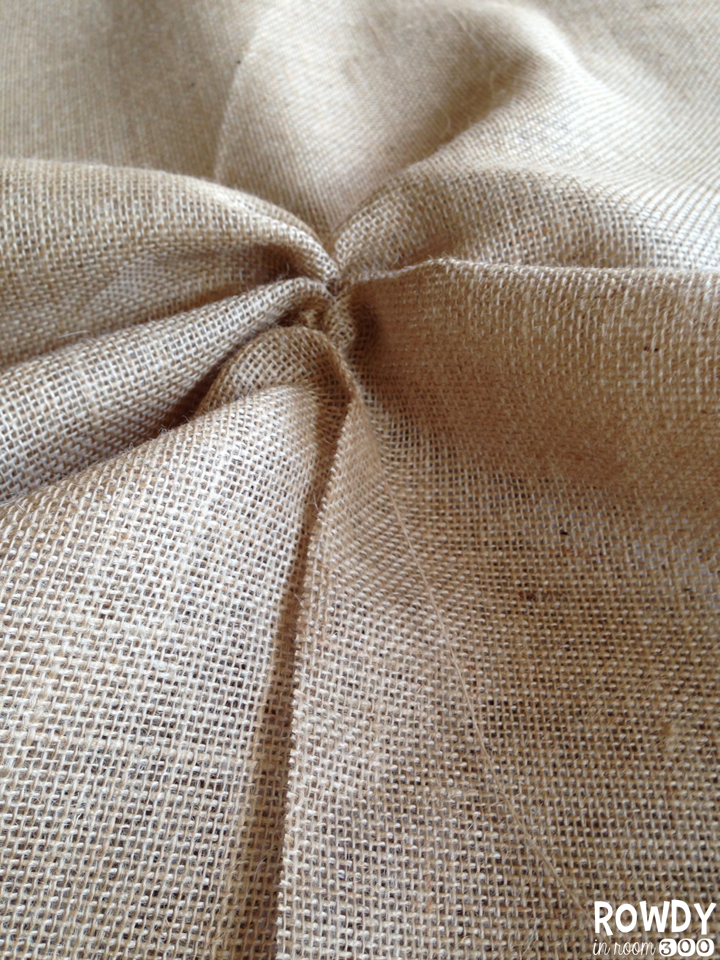
Once you pull that thread out, you will have a perfect guide for a straight cut. Don't measure it! That's crazy and burlap is made to look imperfect :) Then, cut your fabric in half all along that line.

Step 3: NOW you iron it. It doesn't have to be perfect, you just don't want those hard creases to be in the final product.

Step 4: It's time to staple!! On the websites I found, it said to use bed skirt pins..but, let's be honest here. Ain't nobody got time for that! That would take sooooooo long, and I tested it out- the staples pull out of the box spring SUPER easy. When we're tired of it we'll just have to give a little tug and pull out the burlap. No problem.

Start at one corner and fold the burlap over. Staple. Go a few inches over, pinch the fabric, fold it over, and staple again. Repeat. and repeat. You might want a good show on while you're doing this. I was watching Hoda and Kathie Lee {guilty pleasure in the summer!} and it took me most of the hour to complete the whole thing from start to finish.

If you run out of the strip that you are using, just fold the next piece over, staple, and begin with the next piece. Can you see where I started a new piece right before the corner? Didn't think so ;)

Just continue all the way around! I didn't have to worry about the bottom because of the type of frame we have- but I love the look of the un-finished bottom of the burlap, too, if you choose. Don't you just love it?! I'm officially obsessed. Now my next project is to find some burlap throw pillows for our bed! Oh, and all the naked walls, too :P
Hop on over to Tara's blog for the rest of this week's Monday Made Its!!
{after you leave me some love, of course!}


I LOVE your comforter and your burlap bed skirt that you made yourself - most impressive! You are a very talented decorator!
ReplyDeleteThat is awesome! We bought our house in November too, and I think I'm further behind than you on getting things looking cute. I don't even have pictures hung up...too afraid of messing up all the painting we did by not liking where I put a picture once I've got it hung! Haha! Saving this idea, so cute!
ReplyDeleteChristy
Teaching Tales Along the Yellow Brick Road
LOVE LOVE LOVE!!!! I have been wanting to make this forever! Thank you for this wonderful tutorial!
ReplyDeleteMrs. Spriggs’ Kindergarten Pond
Isn't burlap the best? I made an upholstered headboard with burlap this summer.
ReplyDeleteI am so making this!! I hadn't ever seen the pin - how did I miss that?! This will look fantastic in our bedroom. Thanks so much for sharing this great tutorial!
ReplyDeleteCourtney
Polka Dot Lesson Plans
That looks amazing! I saw some burlap throw pillows at Kirkland's the other day- not sure if you have one near you. We have a captain's bed- the kind with drawers underneath so no bedskirt for me. But burlap throw pillows is a great idea!
ReplyDelete-Maria
AMAZING!
ReplyDeleteLooks awesome Nicole!!!
ReplyDeleteLove how it turned out!
ReplyDeleteLinda
Down the Learning Road
Fabulous does not even do it justice!!!!!!!! LOVE LOVE LOVE! Thanks for linking up:)
ReplyDelete4th Grade Frolics
I am OBSESSED with this burlap bed skirt! I am currently trying to de-pink-ify my bedroom for my boyfriend who just moved in, and this is the perfect idea! Thanks for sharing :)
ReplyDeleteGina
Miss Peluso's Kindergarten
Looks great
ReplyDeleteI'm glad I'm not the only one who has a huge to do list for my home this summer! I have been cleaning and decorating in a flurry, because this is the best time to do it. Have fun! :-)
ReplyDeleteKristen
Sprinkled in Second
Burlap's been all the rage! That turned out marvelously :)
ReplyDeleteAnisa @ Creative Undertakings
What a great idea. I just got a new mattress. Maybe I need a new comforter and bedskirt also!
ReplyDeleteAlison
Rockin' and Lovin' Learnin'
This is so wonderful! Makes me want to get a new comforter and bedskirt too! :)
ReplyDeleteMeredith
Looks great - your bed looks so comfy!
ReplyDelete